In this article, I wanna show you an easy but essential post-processing technique: Sharpening.
Why do images need to be sharpened? Because of the digital sensor's nature areas with high contrast, like edges, are not recorded properly. This is because every pixel records only the average light that hit it and not the exact pattern. When a pixel in the sensor records an edge it won't record half a pixel black and the other white but will only record a grey pixel. I know this is a very simple explanation but getting into this topic would take a lot of time and all we want to do today is learn how to sharpen images, so how is it done?
Sharpening is something most comeras do automatically after taking a shot. In point and shoots the sharpening is usually enough, allowing the user not to post-process the image at all.
DSLRs though are designed for advanced photographers who want more control over their results. This is why they're configured to do a much softer sharpening in Jpeg and no sharpening at all in RAW files.
This configuration gives the end user the widest range of possibilities, because a sharpened image can not be desharpened, while an unsharpened raw file can be sharpened at will afterwards. Now we're going to take a look at how it's done.
If we're processing a RAW file in Lightroom or Photoshop the process is slightly different but the adjustments required will be the same. In this example I'm going to use photoshop.
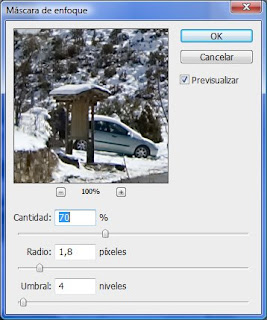
Once you're done editing your image (sharpening should be performed the last), go to filters->sharpen->unsharp mask and you'll find something like this:

The first setting is amount. This determines the amount of contrast this filter will add in the borders. The higher the setting the more aggresive the sharpening will be, be careful though because it will come to a point where the image start to look odd.
The second setting is radius. This determines how many pixels around the borders will get the extra contrast treatment, same as before, the higher the setting, the more aggresive the sharpening.
The third setting is threshold. This lets you preserve smoother areas of being sharpened as well as the sharpening of noise. However this setting will affect the general sharpening negatively so i would preserve the smoother areas and the noise more selectively, by copying it to another layer for example. My advice is keep this setting low
As to the other 2 values there is no setting I can recommend you that will work on every image. You'll have to find out yourself which is the best for your shot. To do that start by raising the amount to around 400%. Then tweak the radius until the image is sharpened without visible artifacts, like halos around the sharpened objects. Keep in mind that the higher the resolution of the image, the higher the radius value has to be. Once you find the adecuate radius, lower the amount to a more reasonable value.
You can view the results in the small preview window or on the normal photoshop window. Keep in mind though, that to view the sharpening effect properly the image should be displayed at 100% or 50% zoom to avoid issues with aliasing of the images.
I set amount at 94% and radius at 1.8 and threshold at 4
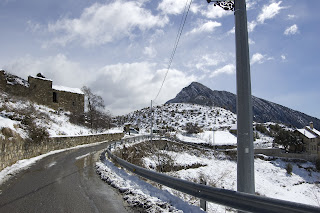
I selected such a small radius for 2 reasons. First this image was at 6Mp which is not a very high resolution. Secondly there were small subjects with high contrast against the snow like the brown bushes, that would give a strange look if the sharpening radius was bigger than the details themselves, this something you will just realize when you try sharpening an image yourself.
These are my results
Before
Full image:
Before: After:
100% crop
Before: After:
As you can see the sharpened images have clearer details, which gives them a more realistic and "professional" look, while the unsharpened ones have a hazy effect, making them look unrealistic.
Tip: If you've read through this tutorial and found sharpening is way too complicated, you can always set you DSLR to sharpen the images automatically, which is done differently depending on the camera. Doing this, however, will give you much less control over the sharpening and can result in badly sharpened areas. What I recommend, as always, is shooting in Raw and then applying Lightroom's default sharpening settings, if lightroom gets it wrong you can effortlessly change the settings and the photo won't be ruined as would happen with in-camera sharpening.
Summing up I would say that sharpening is an essential post-processing effect, that should be performed on every image. I recommend applying a default sharpening filter in lightroom for your regular workflow and tweaking it when there is a special shot you want to sharpen perfectly or the lightroom's adjustments don't work well.


4 comments:
help me.
Good article. Anyway, do visit my page, too...
i think you add more info about it.
very awsome.
Post a Comment