Showing posts with label photoshop. Show all posts

Friday, October 17, 2008

Creating Zoom effect on Photoshop


In my last article I gave you an introduction to the zoom effect on digital photography and showed you how to shoot it with your camera. This effect however is very difficult to master and can be recreated in photoshop with practically identical, or even better results. This is what we're going to learn today.

First of all choose a suitable picture. It can be anything with a subject you want to make stand out. I chose this picture of my bike standing aside a bike trail.

Now you only have to go to filters->blur->radial blur. Here you select the amount of blur, you have to select zoom and you have to select the center of the blur effect (this is the point you want to be in focus). Also I recommend setting the quality to optimal.


Now take a look at the image, if you're satisified with the result then that's it, if not you can try changing the amount and the center of the blur until you like the result.


Also there is a way of making your whole subject stay in focus. If you only follow the steps detailed above, you'll end up with only a small focused point. If you're subject is large however, it will probably be out of focus. But don't worry there is a very easy way to fix that. Select your subject and copy it to another layer, now apply the effect on the background layer and your subject will remain in perfect focus. To select the subject I recommend using quick mask mode (pressing Q) and then painting it all. Once you're done get out of quick mask mode (Q again) and invert the selecion. Now you only have to copy that selection to another layer and you'll have your subject isolated from the background.


Now when you apply the effect on the background, your subject won't be blurred since it's in a separated layer. This is what it will look like:


And that's how you fake zoom effect on photoshop! I hope you found this tutorial useful, also I let you another example here:


Tuesday, September 30, 2008

Faking panning on the pc


In the last post I showed you how you could use the panning technique to give your subject a sense of speed and make it stand out from the background. I hope I have given you enough time to experiment a bit with the effect before showing you the easy way: creating it in photoshop.

Let's take a look at how it works.

We'll take a picture where both the subject and the background are sharp, I've chosen this one:


With the scene so bright and the helicopter moving so, relatively, slow it was impossible to use a shutter speed slow enough to create motion blur. So I decided to recreate it on Photoshop.

Firs thing you want to do is select your subject. I recommend going to quick mask mode (pressing Q) and then "painting" your subject with the brush.

Once you're done click Q to get out of quick mask mode and invert the selection. It's a good idea to copy the helicopter to a new layer.
Now all you have to do is select the background layer and go to filters->blur->motion blur


Here you can select the direction and the amount of blur. The direction will have to be the same as the on of your subject and you can vary the amount if you want to make it more or less blurry , I used 30 pixels, but it will depend on your photo so try different values until you're satisfied.


And that's it now you can recreate the motion blur in your photos without having to use panning. My advice however is to try and make the panning effect straight out of the camera, it will look more realistic and most important it will be much more fun!

Tuesday, September 16, 2008

Post-Processing: Sharpening


In this article, I wanna show you an easy but essential post-processing technique: Sharpening.

Why do images need to be sharpened? Because of the digital sensor's nature areas with high contrast, like edges, are not recorded properly. This is because every pixel records only the average light that hit it and not the exact pattern. When a pixel in the sensor records an edge it won't record half a pixel black and the other white but will only record a grey pixel. I know this is a very simple explanation but getting into this topic would take a lot of time and all we want to do today is learn how to sharpen images, so how is it done?

Sharpening is something most comeras do automatically after taking a shot. In point and shoots the sharpening is usually enough, allowing the user not to post-process the image at all.
DSLRs though are designed for advanced photographers who want more control over their results. This is why they're configured to do a much softer sharpening in Jpeg and no sharpening at all in RAW files.

This configuration gives the end user the widest range of possibilities, because a sharpened image can not be desharpened, while an unsharpened raw file can be sharpened at will afterwards. Now we're going to take a look at how it's done.

If we're processing a RAW file in Lightroom or Photoshop the process is slightly different but the adjustments required will be the same. In this example I'm going to use photoshop.

Once you're done editing your image (sharpening should be performed the last), go to filters->sharpen->unsharp mask and you'll find something like this:
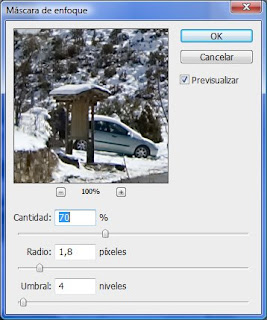


The first setting is amount. This determines the amount of contrast this filter will add in the borders. The higher the setting the more aggresive the sharpening will be, be careful though because it will come to a point where the image start to look odd.

The second setting is radius. This determines how many pixels around the borders will get the extra contrast treatment, same as before, the higher the setting, the more aggresive the sharpening.

The third setting is threshold. This lets you preserve smoother areas of being sharpened as well as the sharpening of noise. However this setting will affect the general sharpening negatively so i would preserve the smoother areas and the noise more selectively, by copying it to another layer for example. My advice is keep this setting low

As to the other 2 values there is no setting I can recommend you that will work on every image. You'll have to find out yourself which is the best for your shot. To do that start by raising the amount to around 400%. Then tweak the radius until the image is sharpened without visible artifacts, like halos around the sharpened objects. Keep in mind that the higher the resolution of the image, the higher the radius value has to be. Once you find the adecuate radius, lower the amount to a more reasonable value.
You can view the results in the small preview window or on the normal photoshop window. Keep in mind though, that to view the sharpening effect properly the image should be displayed at 100% or 50% zoom to avoid issues with aliasing of the images.

I set amount at 94% and radius at 1.8 and threshold at 4

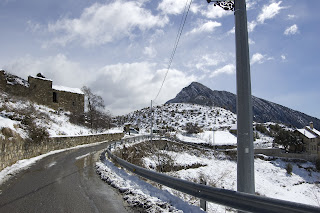
I selected such a small radius for 2 reasons. First this image was at 6Mp which is not a very high resolution. Secondly there were small subjects with high contrast against the snow like the brown bushes, that would give a strange look if the sharpening radius was bigger than the details themselves, this something you will just realize when you try sharpening an image yourself.

These are my results

Before

Full image:
Before: After:


100% crop

Before: After:


As you can see the sharpened images have clearer details, which gives them a more realistic and "professional" look, while the unsharpened ones have a hazy effect, making them look unrealistic.

Tip: If you've read through this tutorial and found sharpening is way too complicated, you can always set you DSLR to sharpen the images automatically, which is done differently depending on the camera. Doing this, however, will give you much less control over the sharpening and can result in badly sharpened areas. What I recommend, as always, is shooting in Raw and then applying Lightroom's default sharpening settings, if lightroom gets it wrong you can effortlessly change the settings and the photo won't be ruined as would happen with in-camera sharpening.

Summing up I would say that sharpening is an essential post-processing effect, that should be performed on every image. I recommend applying a default sharpening filter in lightroom for your regular workflow and tweaking it when there is a special shot you want to sharpen perfectly or the lightroom's adjustments don't work well.

Saturday, September 13, 2008

Post-processing: Converting to black and white


When I created this blog, I wanted to write articles about photgraphy alone, but several users have expressed their interest in digital post-processing too, so I'm going to start a series of articles about basic post-processing techniques and programs.

Probably the most known post-processing effect in digital photography is converting to black and white. This may seem like it's an easy process but doing it well may require some practice.

What is Black and White good for? Sometimes the colors in an image don't express anything or don't serve to create the effect we want, in those cases converting into black and white can be the perfect post-processing effect, freeing our image of all those distracting colors.

First I will explain how to do this effect if you're using lightroom, which I recommend and will talk about in future posts.

We'll take this image as an example.


Open it in developing mode in Lightroom and click on grayscale and you get this result.


Now, you might be happy with this result but it's also possible that this is not the mood you were looking for in the image.
To me, for example the sky and the grass looked too bright. To change this you can go to the channel mixer and change the luminosity of those specific tones. This will make everything with that specific tone to appear darker or brighter in the final image. I changed blue, green and yellow and this is how it looked like in the end.


Lastly, you may want to change some of the general settings, I modified exposure and contrast, it's always recommendable to have the contrast lever higher than the brightness one.


This is the end image:


If you want to reproduce the results in other Image editors like Photoshop or the GIMP you have to look for the channel mixer feature (Image -> Adjustments -> Channel mixer, in Photoshop), then select grayscale and make the adjustments you like like I did in this tutorial.

In the next tutorial I'll teach you how to use selective color to make the subject stand out. Stay tuned and keep experimenting!

Thursday, September 11, 2008

Shooting silhouettes


In our last post, I mentioned that we could create silhouettes in a very easy way, just by using the central spot metering mode . Now I'm gonna show you how to create this effect that can give such a distintive touch to a photograph.

What is a silhouette? A silhouette is created in the limit between an underexposed and a normally exposed area. This means that to create a silhouette we will need a source of light behind our subject that makes it darker than the rest of the scene, like in the example above.

But having that source of light won't create this effect by itself. If we use matrix metering mode (default mode) the camera will try to expose the whole image properly, spoiling the silhouette effect. What we want is the camera exposing properly for the lighter areas only, leaving the rest underexposed to create the silhouettes. To do that we will use central spot metering mode, you can read infomation in more depth in the last article, but basically you want to center the source of light in the frame and then use the AutoExposure-Lock button to tell the camera to expose properly for that lighter area. The darker zones will automatically be underexposed, creating the silhouette effect.

Castelldefels sunset


This technique is not very easy to use and will probably require some practice from you, but once you are used to finding light sources behind your subjects, you will be able to create very nice silhouettes.


TIP: As with many effects in digital photography, this one can we created in Photoshop too, so if you can't get to shoot silhouettes or you just don't get them perfectly, you can tweak them later on the pc. Here's how it's done in Photoshop

  • Open your image
  • Go to Image->Adjustments->Levels
  • Take the lever at the lower end of the brightness range and shift it to the brigther areas, like in this screenshot
  • Once the areas you want to silhouette are dark enough, click ok.
  • That's it, this is what it will look like now.
Mountains


Note: This only works if the shot was taken with a light source behind and has already some silhouette effect. If the shot has none of that effect you'll need to select the area you want to silhouette (I recommend using quick mask mode, pressing Q) and then repeat the same procedure.

And that's it for now, I recommend you not to take the easy way and try to take the silhouettes straight in the camera, but if not you can always cheat your way to perfection :D . Experiment and have fun