Now that we know how to convert photos to black and white I'm going to show you how to use selective color in your pictures.
Selective color is a very aggresive way to make your subject stand out by converting the rest of the image to black and white.
We're going to learn how to use it in photoshop.
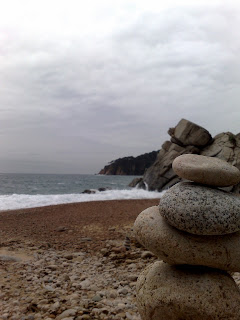
This is the image we'll apply the effect to:


The stones have a very similar color to the background sand and rocks, making them stand out less than I'd like. To solve this we're going to convert all the background to black and white.
First of all we have to select the background, there are many ways to do this but I recommend using quick mask mode (by pressing Q), then going to brush tool and "painting" the stones, like this:
Press Q again to get out of quick mask mode and you'll have the background selected. What I like about this tool, is that using brush makes the edges of your selection soft, allowing some imperfection in your borders. Now you can go to the Channel mixer, like we learned in our previous article and do the black and white conversion.
Remember that the addition of all 3 levers has to be 100% if you want to keep the original luminosity of the image.
And there you've got your selective color effect! Now you can play with contrast, brightness and other options until you've got the image you want. Here's my end result.
Now the stones really stand out against the background, making the image much more interesting
This is another example of selective color
Is there any technique you'd specially like to use? Feel free to post a comment about it!


No comments:
Post a Comment