Tuesday, September 30, 2008

Faking panning on the pc


In the last post I showed you how you could use the panning technique to give your subject a sense of speed and make it stand out from the background. I hope I have given you enough time to experiment a bit with the effect before showing you the easy way: creating it in photoshop.

Let's take a look at how it works.

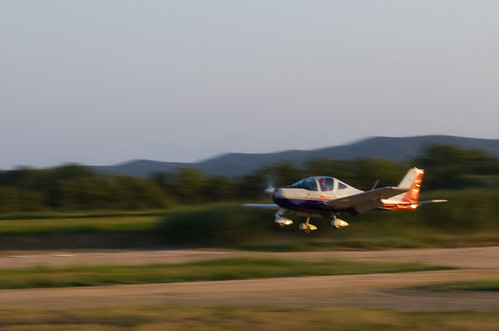
We'll take a picture where both the subject and the background are sharp, I've chosen this one:


With the scene so bright and the helicopter moving so, relatively, slow it was impossible to use a shutter speed slow enough to create motion blur. So I decided to recreate it on Photoshop.

Firs thing you want to do is select your subject. I recommend going to quick mask mode (pressing Q) and then "painting" your subject with the brush.

Once you're done click Q to get out of quick mask mode and invert the selection. It's a good idea to copy the helicopter to a new layer.
Now all you have to do is select the background layer and go to filters->blur->motion blur


Here you can select the direction and the amount of blur. The direction will have to be the same as the on of your subject and you can vary the amount if you want to make it more or less blurry , I used 30 pixels, but it will depend on your photo so try different values until you're satisfied.


And that's it now you can recreate the motion blur in your photos without having to use panning. My advice however is to try and make the panning effect straight out of the camera, it will look more realistic and most important it will be much more fun!

Tuesday, September 23, 2008

Panning


Some days ago we talked about how we could make our subject stand out using selective coloring. Today we're going to learn a technique that will make it stand out and give it a sense of speed. This technique is called Panning.

As you probably know when we shoot a moving subject with a slow shutter speed the subject will appear blurred on the picture. This is something you usually want to avoid, since you want your subject to be in sharp focus. The panning technique however, allows us to benefit from this effect by making the moving subject sharp and the background blurred. How does this technique work? This technique is very simple although it might require some practice. What you need to do is follow your subject with the camera, as long as the sutter is open. This will cause the subject to stay in the same position of the shot throughout the exposure, thus remaining sharp and will cause the background to have motion blur.

Only following the subject with your camera however won't cause the background to be blurred. First you have to make sure that there will be motion blur in your shot. To do that you have to set a slow shutter speed, I recommend using shutter speed priority mode. Setting the correct shutter speed is not easy, set it too low and you'll end up with an overall blurred shot because you won't be able to follow the subject precisely enough.


1/2--------------------------- 1/2

Set it too high and the whole image will be sharp, spoiling the speed effect.


1/495

I recommend using something from 1/6 to 1/60, but it will always depend on your subject's speed, proximity and your focal length.


1/60--------------------------------- 1/25

But setting the right shutter speed is not everything. You have to be able to follow the subject precisely, how do you do that? There is no perfect technique for that, you can use a tripod if the movement is completely horizontal, but I rarely have a tripod by me so I always do it handheld. What I recomemnd you is to start following the subject with your camera moving your whole upper body so that the movement is stable, when you feel you're moving at the same speed of your subject, click the shutter and keep moving with it until the shutter closes again, then stop moving. The most important thing of course is to keep the same speed as your subject while the shutter is open.

Cessna Pigeon

You can always use your flash together with the slow shutter speed to ensure you freeze your subject perfectly, but remember not to freeze the whole scene or the sense of movement will be spoiled. Also if you want to have more probablities of success use the burst mode of your camera and keep shooting as long as you can follow the subject.

And that's all I can teach you about panning, if you want to learn more go outside and practice, practice a lot, that's the only way to get this technique right!

PS: I'll write an article soon about how to fake this effect in photoshop, but don't rely on it, keep practicing, it's nicer and much more fun!

Photos by me and ttstam

Thursday, September 18, 2008

Understanding Histograms


If you've been using digital cameras for some time now, chances are you have already seen lots of histograms. They are shown by most cameras and imaging software and they are a very powerful tool to review your exposure. Today we are going to take a look at them and we're going to answer the question:

How do I interpret a Histogram?

A histogram is a graphical representation of a series of data, it's not only used in digital photography but also in many statistics representations. Every column in a histogram represents a case and its height represents how often this case is presented. Translated into digital photography, every column represents a tonal value, while its height represents how often this value is present in our picture.

The light values in a histogram go from 0, at the left meaning completely dark to 255, at the right meaning completely white.

This means, if a picture is dark the columns in the left will be higher, because a bigger part of the image will be contained in them.

It might sound complicated but let me show you some examples to make it easy.


This is the histogram of a normally exposed image. The tones are well distributed along the histogram from the darker to the lighter areas, there is a very high peak at the brightest end of the histogram showing the overexposed area caused by the light at the lower right corner of the image. These peaks are something to avoid, since parts of the image with so bright tones will end up just white without any appreciable detail. In this image though this is tolerable since the burned area is quite small. Also, we can see a wider peak in the bright area of the histogram caused, that shows the bright area on the wall that's being lit by the light.

What this histogram is telling us about the image is that it has a burned area, it has well distributed tones and an important area of the scene is brighter than normal.

Let's take a look at a completely different Histogram.


This image is was intentionally underexposed to give it a different mood, which is clearly visible in the histogram. If you look at its darker end, you will see how it contains a big part of the image. The brighter end is very low, filled only by some of the light rays and the clouds on the sky. Another important detail we can recognise in this histogram is that there are parts of the image in the very dark end of the histogram, as opposite to the image before, this shows that a part of the image will be shown black without any appreciable detail, once again this is something acceptable in this photograph because it creates the silhouette at the bottom of the picture. However you should try to avoid having values at the lower end of the histogram if you don't want any part of the image to be completely black.

So summing up, we have seen that a Histogram allows us to see how bright or how dark our image is, without having to rely on its brightness on the LCD screen, which can be affected by other factors like ambient light. It will also show us if we have burned or dodged any part of the image, so that we can notice if we have lost details in our picture, which is very difficult to see on the LCD screen only.

I hope this was a clear article, if you have any doubts or suggestions, don't forget you can let me know in a comment. Thanks!

Tuesday, September 16, 2008

Post-Processing: Sharpening


In this article, I wanna show you an easy but essential post-processing technique: Sharpening.

Why do images need to be sharpened? Because of the digital sensor's nature areas with high contrast, like edges, are not recorded properly. This is because every pixel records only the average light that hit it and not the exact pattern. When a pixel in the sensor records an edge it won't record half a pixel black and the other white but will only record a grey pixel. I know this is a very simple explanation but getting into this topic would take a lot of time and all we want to do today is learn how to sharpen images, so how is it done?

Sharpening is something most comeras do automatically after taking a shot. In point and shoots the sharpening is usually enough, allowing the user not to post-process the image at all.
DSLRs though are designed for advanced photographers who want more control over their results. This is why they're configured to do a much softer sharpening in Jpeg and no sharpening at all in RAW files.

This configuration gives the end user the widest range of possibilities, because a sharpened image can not be desharpened, while an unsharpened raw file can be sharpened at will afterwards. Now we're going to take a look at how it's done.

If we're processing a RAW file in Lightroom or Photoshop the process is slightly different but the adjustments required will be the same. In this example I'm going to use photoshop.

Once you're done editing your image (sharpening should be performed the last), go to filters->sharpen->unsharp mask and you'll find something like this:


The first setting is amount. This determines the amount of contrast this filter will add in the borders. The higher the setting the more aggresive the sharpening will be, be careful though because it will come to a point where the image start to look odd.

The second setting is radius. This determines how many pixels around the borders will get the extra contrast treatment, same as before, the higher the setting, the more aggresive the sharpening.

The third setting is threshold. This lets you preserve smoother areas of being sharpened as well as the sharpening of noise. However this setting will affect the general sharpening negatively so i would preserve the smoother areas and the noise more selectively, by copying it to another layer for example. My advice is keep this setting low

As to the other 2 values there is no setting I can recommend you that will work on every image. You'll have to find out yourself which is the best for your shot. To do that start by raising the amount to around 400%. Then tweak the radius until the image is sharpened without visible artifacts, like halos around the sharpened objects. Keep in mind that the higher the resolution of the image, the higher the radius value has to be. Once you find the adecuate radius, lower the amount to a more reasonable value.
You can view the results in the small preview window or on the normal photoshop window. Keep in mind though, that to view the sharpening effect properly the image should be displayed at 100% or 50% zoom to avoid issues with aliasing of the images.

I set amount at 94% and radius at 1.8 and threshold at 4

I selected such a small radius for 2 reasons. First this image was at 6Mp which is not a very high resolution. Secondly there were small subjects with high contrast against the snow like the brown bushes, that would give a strange look if the sharpening radius was bigger than the details themselves, this something you will just realize when you try sharpening an image yourself.

These are my results

Before

Full image:
Before: After:


100% crop

Before: After:


As you can see the sharpened images have clearer details, which gives them a more realistic and "professional" look, while the unsharpened ones have a hazy effect, making them look unrealistic.

Tip: If you've read through this tutorial and found sharpening is way too complicated, you can always set you DSLR to sharpen the images automatically, which is done differently depending on the camera. Doing this, however, will give you much less control over the sharpening and can result in badly sharpened areas. What I recommend, as always, is shooting in Raw and then applying Lightroom's default sharpening settings, if lightroom gets it wrong you can effortlessly change the settings and the photo won't be ruined as would happen with in-camera sharpening.

Summing up I would say that sharpening is an essential post-processing effect, that should be performed on every image. I recommend applying a default sharpening filter in lightroom for your regular workflow and tweaking it when there is a special shot you want to sharpen perfectly or the lightroom's adjustments don't work well.

Saturday, September 13, 2008

Post-processing: Selective color


Now that we know how to convert photos to black and white I'm going to show you how to use selective color in your pictures.

Selective color is a very aggresive way to make your subject stand out by converting the rest of the image to black and white.

We're going to learn how to use it in photoshop.

This is the image we'll apply the effect to:


The stones have a very similar color to the background sand and rocks, making them stand out less than I'd like. To solve this we're going to convert all the background to black and white.

First of all we have to select the background, there are many ways to do this but I recommend using quick mask mode (by pressing Q), then going to brush tool and "painting" the stones, like this:


Press Q again to get out of quick mask mode and you'll have the background selected. What I like about this tool, is that using brush makes the edges of your selection soft, allowing some imperfection in your borders. Now you can go to the Channel mixer, like we learned in our previous article and do the black and white conversion.


Remember that the addition of all 3 levers has to be 100% if you want to keep the original luminosity of the image.

And there you've got your selective color effect! Now you can play with contrast, brightness and other options until you've got the image you want. Here's my end result.


Now the stones really stand out against the background, making the image much more interesting

This is another example of selective color


grafitis

Is there any technique you'd specially like to use? Feel free to post a comment about it!

Post-processing: Converting to black and white


When I created this blog, I wanted to write articles about photgraphy alone, but several users have expressed their interest in digital post-processing too, so I'm going to start a series of articles about basic post-processing techniques and programs.

Probably the most known post-processing effect in digital photography is converting to black and white. This may seem like it's an easy process but doing it well may require some practice.

What is Black and White good for? Sometimes the colors in an image don't express anything or don't serve to create the effect we want, in those cases converting into black and white can be the perfect post-processing effect, freeing our image of all those distracting colors.

First I will explain how to do this effect if you're using lightroom, which I recommend and will talk about in future posts.

We'll take this image as an example.


Open it in developing mode in Lightroom and click on grayscale and you get this result.


Now, you might be happy with this result but it's also possible that this is not the mood you were looking for in the image.
To me, for example the sky and the grass looked too bright. To change this you can go to the channel mixer and change the luminosity of those specific tones. This will make everything with that specific tone to appear darker or brighter in the final image. I changed blue, green and yellow and this is how it looked like in the end.


Lastly, you may want to change some of the general settings, I modified exposure and contrast, it's always recommendable to have the contrast lever higher than the brightness one.


This is the end image:


If you want to reproduce the results in other Image editors like Photoshop or the GIMP you have to look for the channel mixer feature (Image -> Adjustments -> Channel mixer, in Photoshop), then select grayscale and make the adjustments you like like I did in this tutorial.

In the next tutorial I'll teach you how to use selective color to make the subject stand out. Stay tuned and keep experimenting!

Friday, September 12, 2008

Video on DSLRs?


I think I'll take a break from the tutorials and write an article about a topic, that is on every photographers head lately. Some weeks ago Nikon presented its D90, successor of the D80 with HD video capabilities, rumors say Canon will present a similar feature in one of its future cameras too and many users are asking themselves:

Should video be implemented on DSLRs?

This is a very complicated topic and I think many of us have formed an opinon without really thinking twice about it, so I'm going to try and write down all the positive and negative aspects of this new feature.

The first many people, including myself, thought when they heard about this new feature was, what for? DSLRs are specialized in taking pictures and don't need the video capabilities.
This answer however isn't really based on any facts or arguments but rather in our feeling about digital photography. But are there arguments against implementation of video on DSLRs? Let's analyze what negative points video might bring to DSLRs:
  • Size, the size of a video processing chip is ridiculously small.
  • Battery consumption, probably close to none when feature is idle.
  • Cost. Here's the only argument I think would be worth taking into consideration:
The cost of the video processing and encoding chip isn't probably too high. Maybe this chip will be embedded in the next generation of EXPEED processors in the future so it will sink even further. The development of the hardware and software necessary for recording video though can get more pricey. Considering Nikon has got no experience with video, putting its developers to work on that feature costs the company time and money, that they could be invesing in other features. This is something we can't deny, but we have to think: Is video really such an uninteresting feature?

Most of us probably have multiple devices able to capture video: Videocameras, Point and Shoots, mobile phones... but all of them lack a lot of things that video-enabled DSLRs will have:

  • Quality: Probably the most important difference between the devices mentioned before and the D90 is the quality. The resolution recorded by state of the art mobile phones and typical point and shoots never goes beyond 640x480 or 0.3 megapixels. The D90 however will record in 1280x720 pixels (around 1 MP) and the roumoured canon camera might go even further with fullHD, that's 1920x1080 pixels. A constant stream of 2 Mega-Pixels shots at 30 frames per second. Now, we are sick of saying megapixels don't matter on a digital camera. That is not true at this level. The difference in quality between a 6 megapixel and a 25 megapixel shot, won't be even noticeable in a computer monitor or a TV set, that is because a monitor or TV can display a maximum of 2 megapixels at the same time, and we're talking about very high resolution devices. The difference between 0.3 and 2 megaxpiels though is a very different thing. A good (FullHD) TV set will be able of displaying those 2 megapixels recorded by DSLRs, making the 0.3 megapixels of Point and shoots look ridicolous. Most videocameras also record at 0,3 resolution, except for the new HD video cameras. But the D90's sensor has some other advantages apart from the resolution, its ISO capabilities are much better than the ones of any of the devices mentioned above, allowing for shooting in very low light.
  • Versatility: What do Point and shoots, mobile phones and most videocameras have in common? They have 1 lens, may be prime lens may be zoom lens, but that's it. If you want any other lens or effect you've got no upgrade possibility. Changing lenses is something DSLRs are well known for and this capability will prove valuable in video shooting just as it does when we shoot pictures. It's not the same to record a sports event where we want to have a wide angle lens to record the whole scene as to record wildlife where we want to be able to stay as far away as possible using a telephoto.
  • Convenience: Have you never been outside shooting and wanted to shoot a video? Do you take an extra camera just to take short videos on your trips? With video on the DSLR you just need 1 device that will take pictures and videos, and both with outstanding quality, the D90 might have some issues like the lack of autofocus but those issues will be solved for sure in the future, a problem we can't forget so easily though is the size of the videos, that will only allow for shorter clips unlike with videocameras.
  • Creative Possibilities. A similar point to versatility, changing lenses allows for more creative videos and so does the small depth of field created by DSLR lenses that will allow you to make your subject stand out while other devices will just have all the scene in focus
In my opinion those advantages will in the future make video capable DSLRs well worth the extra price, and even more considering that price will get smaller with time. Also the user base of HDTVs capable of displaying HD video is growing bigger every day, which will accelerate the process even more. What do you think? Will future DSLRs all come with video or will this just be a forgotten feature? You can leave your opinion on the comments or vote on the poll.

Thursday, September 11, 2008

Shooting silhouettes


In our last post, I mentioned that we could create silhouettes in a very easy way, just by using the central spot metering mode . Now I'm gonna show you how to create this effect that can give such a distintive touch to a photograph.

What is a silhouette? A silhouette is created in the limit between an underexposed and a normally exposed area. This means that to create a silhouette we will need a source of light behind our subject that makes it darker than the rest of the scene, like in the example above.

But having that source of light won't create this effect by itself. If we use matrix metering mode (default mode) the camera will try to expose the whole image properly, spoiling the silhouette effect. What we want is the camera exposing properly for the lighter areas only, leaving the rest underexposed to create the silhouettes. To do that we will use central spot metering mode, you can read infomation in more depth in the last article, but basically you want to center the source of light in the frame and then use the AutoExposure-Lock button to tell the camera to expose properly for that lighter area. The darker zones will automatically be underexposed, creating the silhouette effect.

Castelldefels sunset


This technique is not very easy to use and will probably require some practice from you, but once you are used to finding light sources behind your subjects, you will be able to create very nice silhouettes.


TIP: As with many effects in digital photography, this one can we created in Photoshop too, so if you can't get to shoot silhouettes or you just don't get them perfectly, you can tweak them later on the pc. Here's how it's done in Photoshop

  • Open your image
  • Go to Image->Adjustments->Levels
  • Take the lever at the lower end of the brightness range and shift it to the brigther areas, like in this screenshot
  • Once the areas you want to silhouette are dark enough, click ok.
  • That's it, this is what it will look like now.
Mountains


Note: This only works if the shot was taken with a light source behind and has already some silhouette effect. If the shot has none of that effect you'll need to select the area you want to silhouette (I recommend using quick mask mode, pressing Q) and then repeat the same procedure.

And that's it for now, I recommend you not to take the easy way and try to take the silhouettes straight in the camera, but if not you can always cheat your way to perfection :D . Experiment and have fun

Tuesday, September 9, 2008

Understanding Metering modes


In our series of articles about "Mastering the basics" we learned about the different settings to use to get the right exposure, but we never talked about the way we metered available light.

Now, we're going to take a look at the camera's metering modes.

Every modern camera has a sensor that measures how much light is getting through the lens. In most cameras we can chose how we want the camera to do it. There are 3 different metering modes:

Matrix metering: The most used of all modes, the camera measures light from all points in the scene, and attemps to set the exposure in a way that the whole scene is properly lit.
This is a very easy to use and effective metering mode because the largest possible part of the image will be properly exposed. Similarily to the auto mode, though this metering mode has its limitations when we want to have some advanced control over the resulting image.

Center weighted spot metering: This mode comes in very handy when shooting differently lit scenes. Imagine for example, that you're shooting at a concert. The whole scene is dark, except for the performer in who is lit by spotlights. Using the matrix mode, the camera will try to expose the biggest part of the scene, as a result the preeminent darker zones will be properly exposed, while the performer will be overexposed. This will be in many cases far from the ideal result. In these situations we'll use the center weighted metering mode, now the camera will prioritize the area in the middle and expose properly for a portion of approximately 25% of the image around its center.


Photo by sint

Central spot metering: This is the most selective mode, the camera will expose properly for a point situated in the exact center of the image. The rest of the scene will not be taken into consideration. I do not recommend this mode in most of the cases because light can change a lot from one point to another and the readings won't be very useful if we use one point only. It can be a good mode to use if we want to select an exact point for the camera to expose properly though which can be useful for example for creating silhouettes or for complicated light situations.


Now, when you read about the last two metering modes you were probably asking yourself, what about the framing? What if I want the performer in the concert to be properly exposed, without framing him in the middle?

Well, camera designers were aware of this problem and that's what the Auto Exposure Lock button is for. Most DSLRs have this button that allows you to lock the exposure settings once your camera has taken the light readings and adjusted its settings accordingly. This will allow you to take the light readings from the performer by placing him in the center and then, with the AE-Lock button pushed frame the shot as you want to.

Summing up: Center weightered and center spot metering modes, allow you to chose the part of the image you want to be correctly exposed, while matrix metering mode will try to have the whole image exposed properly.

Friday, September 5, 2008

Shooting star trails

In our last article we learned how to shoot all kinds of light trails, now we're going to take a deeper look at how to shoot star trails.

First of all. What are star trails?

Star trails


When you look at the stars at night, they seem to be stuck, but if you stare for a couple of minutes you'll start to realize that they're moving, only very slowly. This effect is created by the earth's rotation and not by the movement of the stars themselves. Every star in the sky makes a whole turn around the pole star. This particular one is right in the axis of the earth's rotation and this causes it not to move in the sky and always head north, that is why this star has been used by travellers thousands of years ago to guide themselves in the night, yes I like science :D but we're moving away from our main topic.

What is the effect of this motion when we shoot stars at night?


If we shoot stars with a shutter speed long enought to capture this movement, the stars will create trails in the form of circles around the polar star, decorating our shot with a very interesting sky.

How do we set up our camera to achieve these results?


This will be a little more complicated than with standard light trails. First of all you will need a remote control, or any other device that allows you to use the bulb mode of your camera. Setting up the maximum 30 sec exposure configured in your camera won't be enough to capture the star's movement.
To set up bulb mode we'll need to go into manual. Se the ISO to minimum, aperture preferably to a high value and shutter speed to bulb mode. Set the focus to manual and focus on infinity.
I also recommend using a long focal length because stars will appear to move faster when the lens is zoomed in.

And this is it, you can start to experiment with different compositions and shutter speeds, keep in mind however that very long shutter speeds will create too much noise in the image, remember turning the noise reduction function of your camera to minimize this effect. If you want to have longer trails, you can create a series of relatively short exposures and then blend them together in photoshop.


It is important to be able to identify the pole star, since all the stars will turn around it, making it a strong subject of your composition. To find it look north and find a very bright star.

And last but not least, keep in mind that this kind of photography works best at clear skies without luminic contamination, so run away from big cities.

Photographs by Corica, Warner Strauss and me.