
In our last post, I mentioned that we could create silhouettes in a very easy way, just by using the central spot metering mode . Now I'm gonna show you how to create this effect that can give such a distintive touch to a photograph.
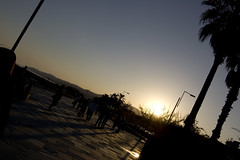
What is a silhouette? A silhouette is created in the limit between an underexposed and a normally exposed area. This means that to create a silhouette we will need a source of light behind our subject that makes it darker than the rest of the scene, like in the example above.
But having that source of light won't create this effect by itself. If we use matrix metering mode (default mode) the camera will try to expose the whole image properly, spoiling the silhouette effect. What we want is the camera exposing properly for the lighter areas only, leaving the rest underexposed to create the silhouettes. To do that we will use central spot metering mode, you can read infomation in more depth in the last article, but basically you want to center the source of light in the frame and then use the AutoExposure-Lock button to tell the camera to expose properly for that lighter area. The darker zones will automatically be underexposed, creating the silhouette effect.
This technique is not very easy to use and will probably require some practice from you, but once you are used to finding light sources behind your subjects, you will be able to create very nice silhouettes.
TIP: As with many effects in digital photography, this one can we created in Photoshop too, so if you can't get to shoot silhouettes or you just don't get them perfectly, you can tweak them later on the pc. Here's how it's done in Photoshop
- Open your image

- Go to Image->Adjustments->Levels
- Take the lever at the lower end of the brightness range and shift it to the brigther areas, like in this screenshot

- Once the areas you want to silhouette are dark enough, click ok.
- That's it, this is what it will look like now.
Note: This only works if the shot was taken with a light source behind and has already some silhouette effect. If the shot has none of that effect you'll need to select the area you want to silhouette (I recommend using quick mask mode, pressing Q) and then repeat the same procedure.
And that's it for now, I recommend you not to take the easy way and try to take the silhouettes straight in the camera, but if not you can always cheat your way to perfection :D . Experiment and have fun
3 comments:
Thank you for your comment tl I didn't really think of writing about post-processing alone, but I see a lot of users are interested on it, so I'm going to write some articles about it.
Also I've got a friend running a post-processing blog I'll ask him about writing some guest post or linking to his blog.
Thanks for your feedback, you've also got a very interesting blog running!
PS: The 2 comments I deleted above were just spam about crappy lotto sites, hope you don't mind :P
Post a Comment